Segments
The Segments section provides a centralized view of all audience segments you’ve created, including key details such as recipient type, associated channel, brand, and last update timestamp.

Each segment defines a group of recipients—Subscribers, Consumers, or Both—based on specific filtering criteria.
- Consumers are identified customers with rich profiles, including purchase history, loyalty tier, earned and redeemed points, and other behavioral data.
- Subscribers are simpler contact lists, typically collected through newsletter registrations, landing pages, or opt-in forms.
Segments are essential for targeting: they allow you to define precisely who will receive your communications—whether in standard campaigns or automated flows.
Segment Table Columns
| Column | Description |
|---|---|
| ID | Unique identifier assigned to each segment. |
| Name | Internal name used to identify the segment. |
| Brand | The brand the segment is associated with (useful for multi-brand environments). |
| Automation Type | The automation trigger the segment is linked to (e.g. Welcome, Replenishment, Abandoned Cart). |
| Recipient Type | The type of recipient: Subscriber, Consumer, or Both. |
| Type | Communication channel: Email, SMS, or Viber. Helps ensure proper consent is in place for that channel. |
| Custom | Indicates whether the segment is manually defined using SQL (✓) or auto-generated (✗). |
| Members Count | The number of recipients currently included in the segment. |
| Last Update | The date and time when the segment was last calculated. |
| Actions | Actions available for each segment: |
| • Edit – Open the segment editor to modify its configuration. | |
| • Refresh – Recalculate the segment to update its member count. | |
| • Delete – Permanently delete the segment (only possible if unused by campaigns). | |
| • Hide – (Not shown) Hide the segment from the list without deleting it. | |
| • Clone – Create a duplicate of the segment for reuse or adjustments. | |
| • SQL – View the raw SQL query used to generate the segment (useful for developers customizing or debugging segment logic). |
Create a New Segment
Click the New Segment button to open the segment builder and define your audience using filters or custom SQL.
Segment Configuration
When editing or creating a segment in Mercury, you can use the tabbed interface to define inclusion and exclusion criteria. Each tab allows you to refine your audience with specific filters.
After configuring your filters, click Save to apply the segment settings. Use the Reset button to discard changes and restore the previous state.
Basic Settings
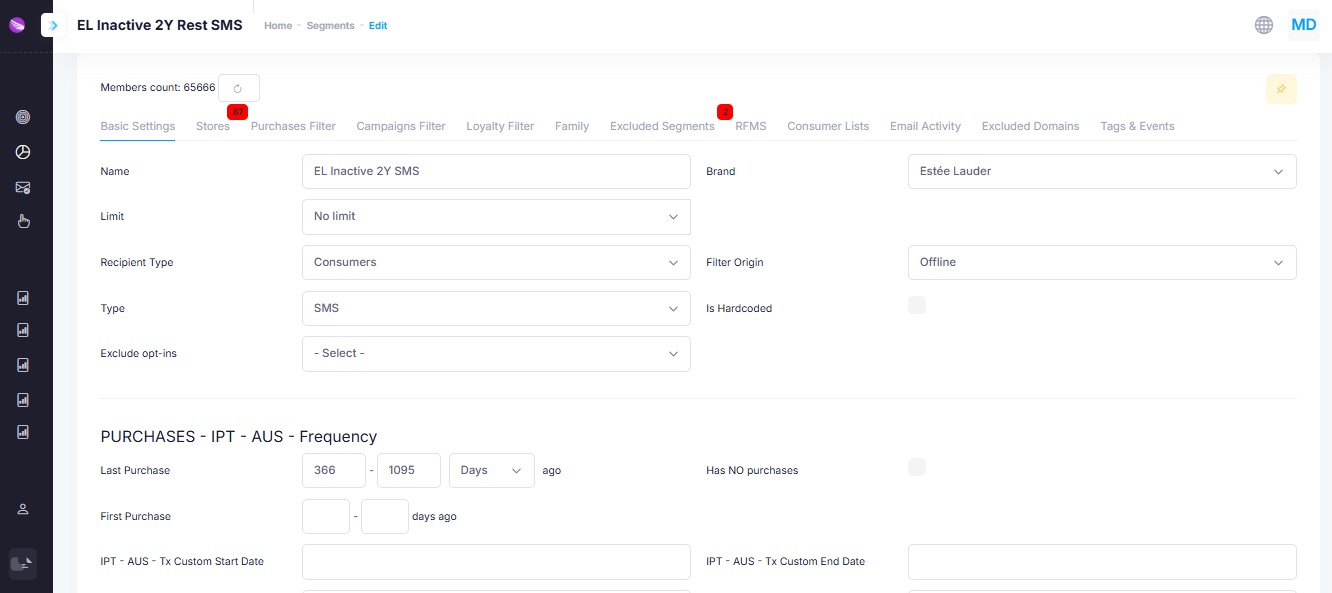
Define core segment properties:
- Name: Internal name of the segment.
- Brand: Associated brand (useful for multi-brand setups).
- Limit: Optionally restrict the number of members. Select Top X to send to specific amount of recipients (e.g. first 500) or Top X percent to send to a proportion of your list (e.g. top 20%). When you select a limit your members are sorted by revenue.
- Recipient Type: Choose between Consumers, Subscribers, or Both.
- Type: Message channel:
- Undefined (include all recipients irrespective of opt-ins),
- SMS/Viber/Viber fallback SMS: must have a valid mobile phone on record and optin to mobile messages
- Email: Must have a valid email on record and optin to email messages
- Direct Mail: Used to send invitations by post. Must have a valid delivery address on file.
- Gift: Used to create lists of gift recipients. Must have a valid delivery address on file.
- Telephone Call: Used to create lists for call-outs. Must have a valid phone on record (mobile or landline) and have opted-in for this type of communication
- Filter Origin: Define whether the filter applies to Anybody None, Online, Offline, Exclusively Online, Exclusively Offline or Intersection (Both online & offline) consumers.
- Exclude Opt-ins: Choose a consent category to exclude opt-ins. Options: Email, Mobile Message, Telephone, Direct Mail. Usefull if you wish to target members on multiple channels with priorities. E.g. send this message via SMS but for those that do not have SMS optin send it by email.
- Is Hardcoded: Check if the segment will be manually built using SQL. When Is Hardcoded is ticked you must provide the SQL query yourself. The rest of the filters will not apply in this case. This should be used vary rarely and only by developers who know what they are doing. The available segment filters cover most of use cases.
PURCHASES – IPT – AUS – Frequency
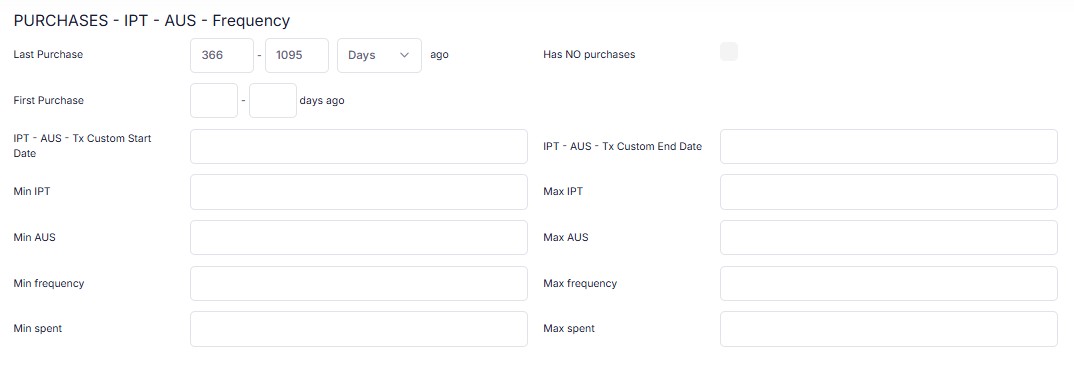
These fields let you filter based on transaction behavior, using both predefined metrics and custom time ranges:
- Last Purchase: Define the time range (in days, months or years) for a customer’s most recent purchase.
- First Purchase: Filter customers based on how long ago their first purchase occurred.
- Has NO purchases: Exclude users without any transaction history.
- Custom Date Range: Set start and end dates for filtering specific purchase windows.
- IPT / AUS / Frequency:
- IPT = Items Per Transaction
- AUS = Average Unit Spent
- Frequency = Number of transactions
- Min/Max Spent: Filter based on the total amount spent.
Demographics & Registration
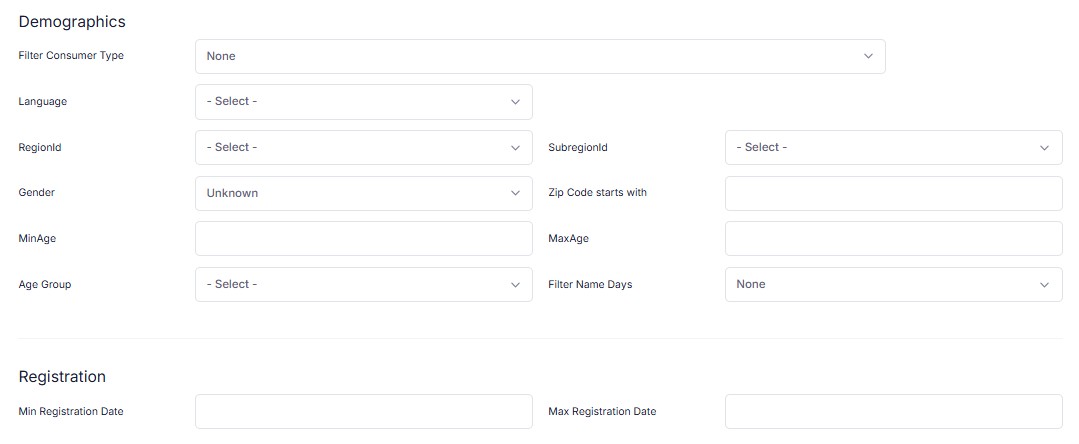
This section allows segmentation based on customer demographics and profile fields:
Demographics
- Consumer Type: Define the audience (e.g. regular, VIP, etc.).
- Language: Filter by preferred language.
- Region / Subregion: Filter based on geographic region.
- Gender: Filter by gender or leave as Undefined.
- Age Range: Use MinAge and MaxAge or predefined Age Group.
- Zip Code Starts With: Filter customers by postal code prefix.
- Filter Namedays: Target recipients who have a specific nameday from our namedays list.
Registration
- Min/Max Registration Date: Filter based on account creation date.
Automation Trigger Settings

If the segment is used in an automation, define the trigger type here:
- Automation Type: Select from triggers like Cart Abandonment, First Purchase, Welcome, etc.
This ensures the segment is tied to a valid automation type and will be recognized by Mercury's trigger logic.
Used in Campaigns

This area shows all campaigns and automations currently using this segment.
- Each linked campaign appears as a clickable entry.
- Click the link to open the campaign directly and view or edit its configuration.
This is useful to avoid accidental edits or deletions of segments in active use.
Stores
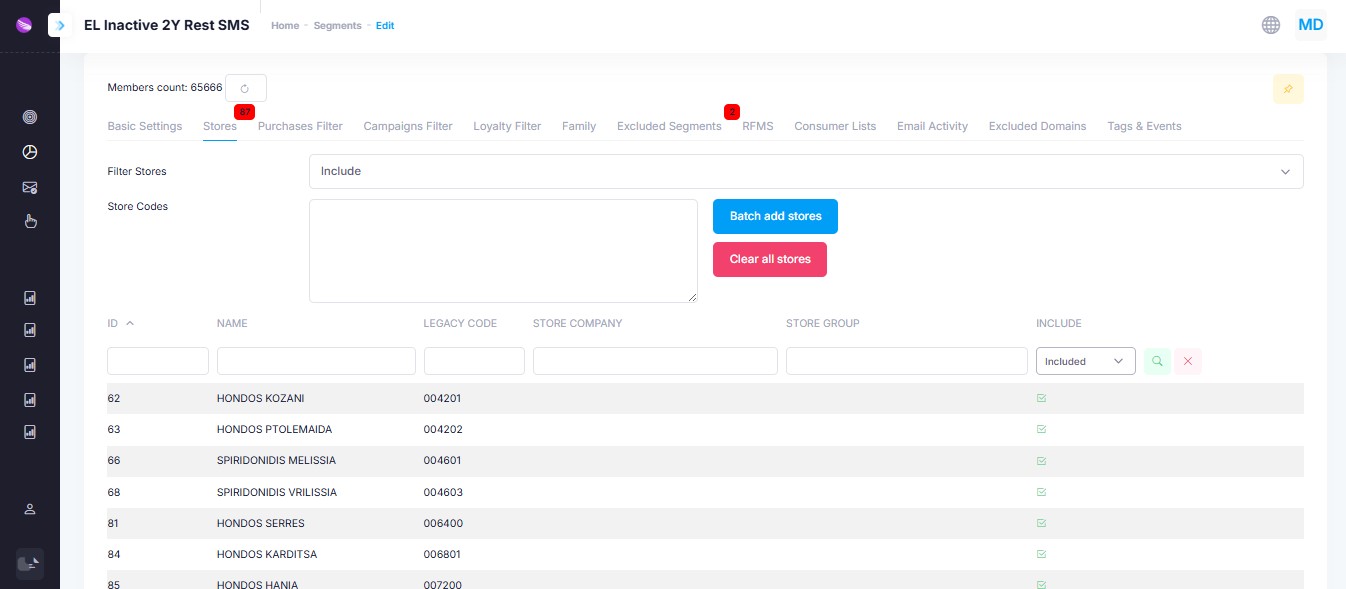
Use this tab to include or exclude consumers based on their associated service store. This is especially useful for geo-targeted messaging or in franchise scenarios, where offers and promotions may vary by location.
- Filter Stores: Select whether to Include or Exclude specific stores from the segment.
- Store Codes: Manually paste or search for store codes to define your selection.
- Batch Add Stores: Quickly add multiple stores from a pre-defined list.
- Clear All Stores: Remove all previously selected stores in one click.
- Table Filters: Use columns like ID, Name, Legacy Code, Store Company, and Store Group to search and narrow down the store list.
Each row in the table can be individually toggled using the Include dropdown to adjust whether that store should be part of the filter.
Purchases Filter
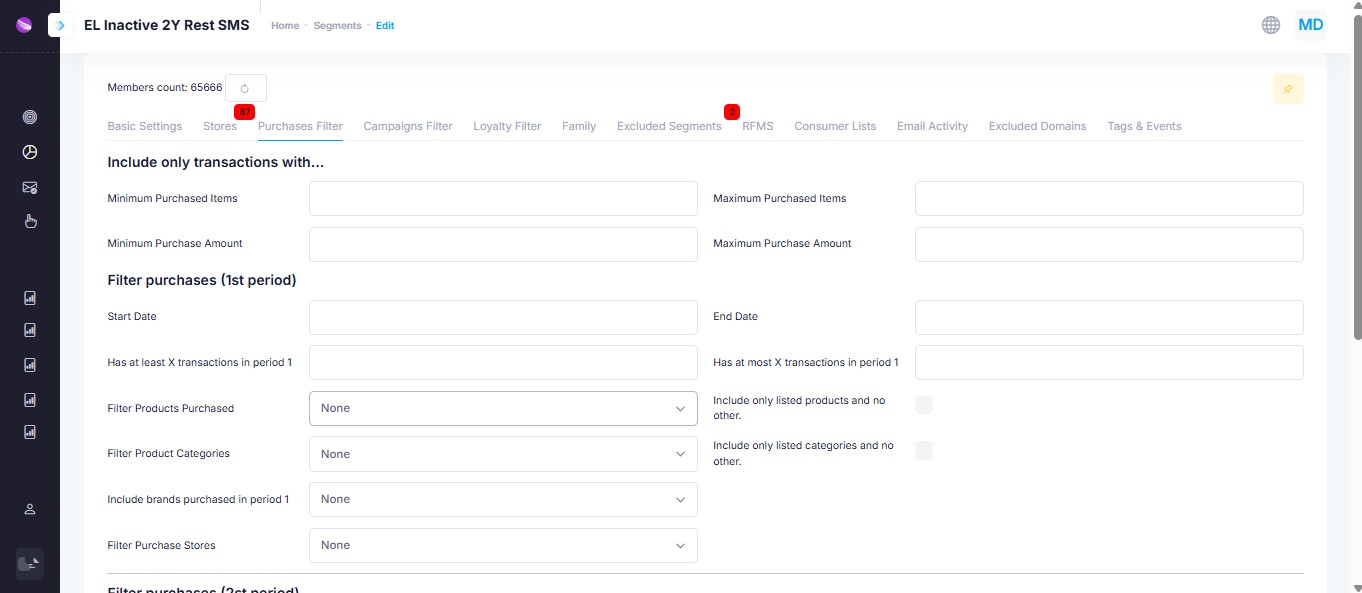
Define inclusion rules based on transaction behavior:
- Minimum/Maximum Purchased Items
- Minimum/Maximum Purchase Amount
- Purchase Date Range
- Number of transactions in a specific period
- Filter by Purchased Products, Categories, Brands, or Stores
- Optionally restrict to only listed values (checkbox)
Campaigns Filter
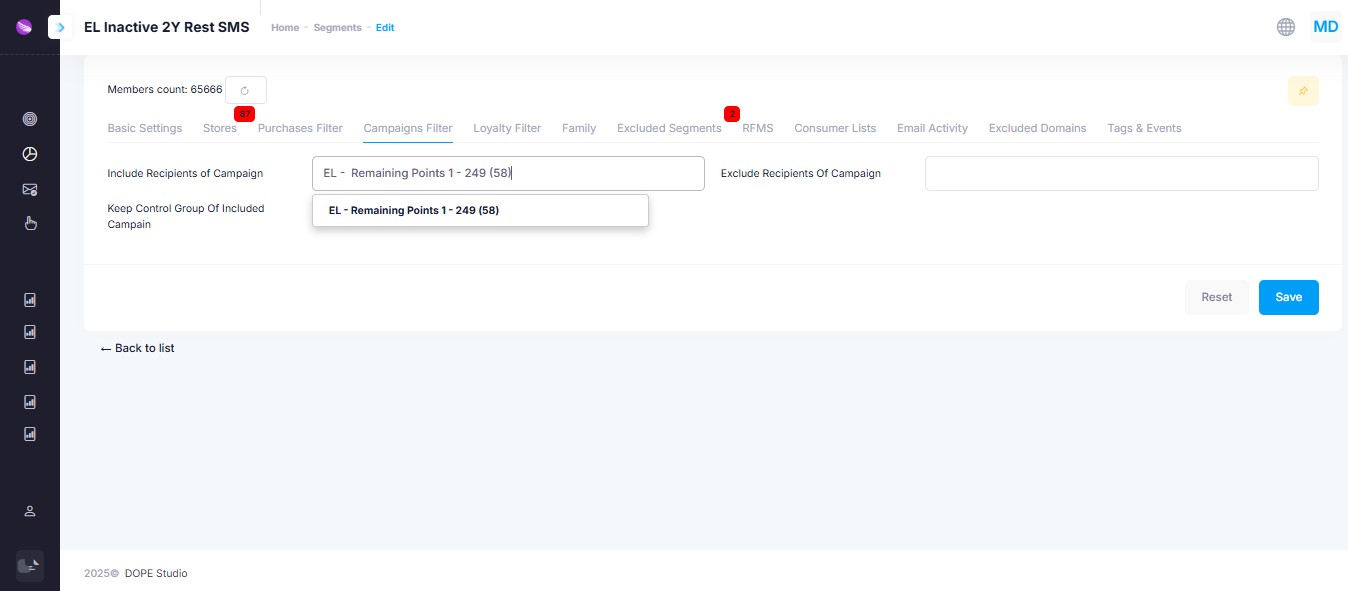
Filter based on campaign interaction history:
- Include Recipients of Campaign – Target users who received a specific campaign
- Keep Control Group – Include or exclude users from the control group of that campaign
- Exclude Recipients of Campaign – Omit users who were already targeted
Loyalty Filter
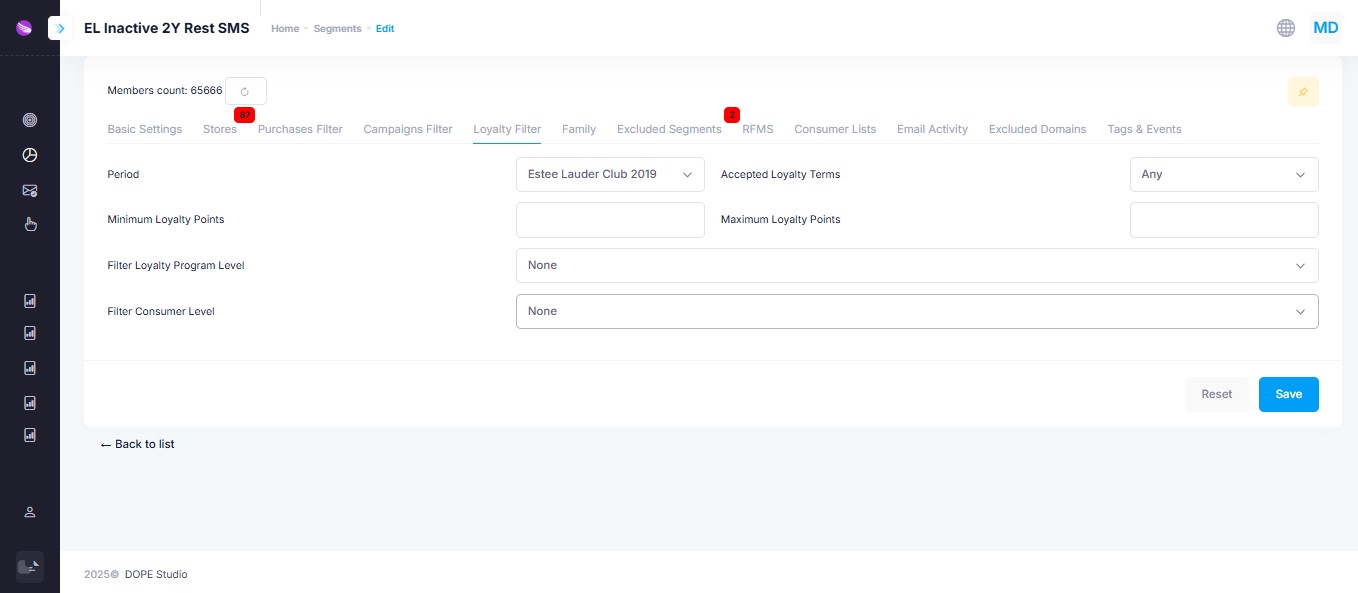
Segment based on loyalty program details:
- Loyalty Program & Period
- Minimum / Maximum Loyalty Points
- Accepted Loyalty Terms
- Filter by Loyalty Program Level
- Filter by Consumer Level
Family
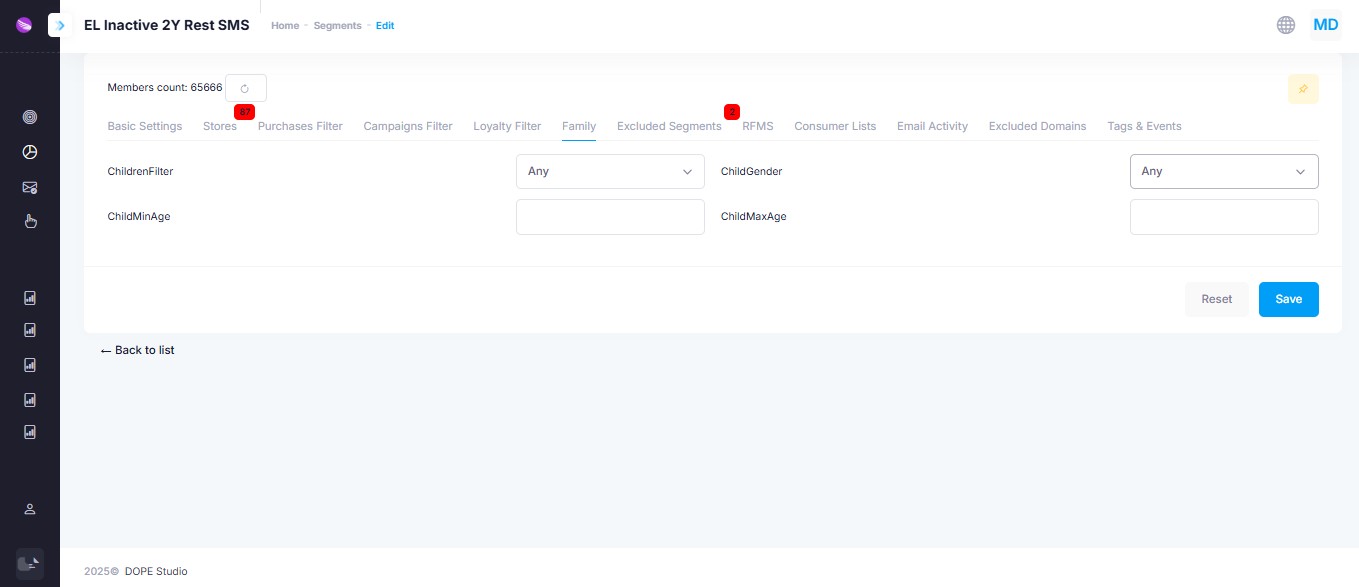
Use this tab to filter customers based on child-related criteria. This is useful for campaigns targeting families with children within specific age or gender groups.
- ChildrenFilter: Filter logic applied to the presence of children. Options include: Any, Has children, Has no children.
- ChildMinAge / ChildMaxAge: Define an age range for the children to be considered (e.g. 3–12 years old).
- ChildGender: Filter by the gender of the child (e.g. Male, Female, Any).
These filters apply only if child-related data has been collected in the consumer profile.
Excluded Segments
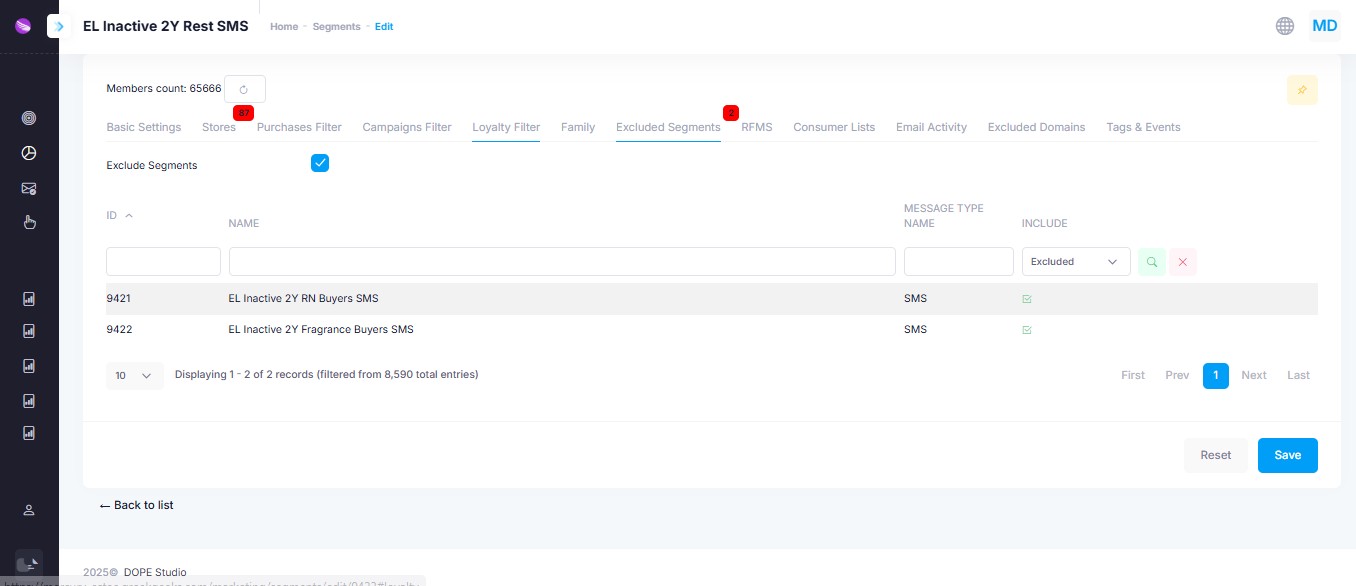
Exclude members of other existing segments:
- Search and select segments to exclude
- Filter by name or message type
- Add multiple exclusions if needed
RFMS
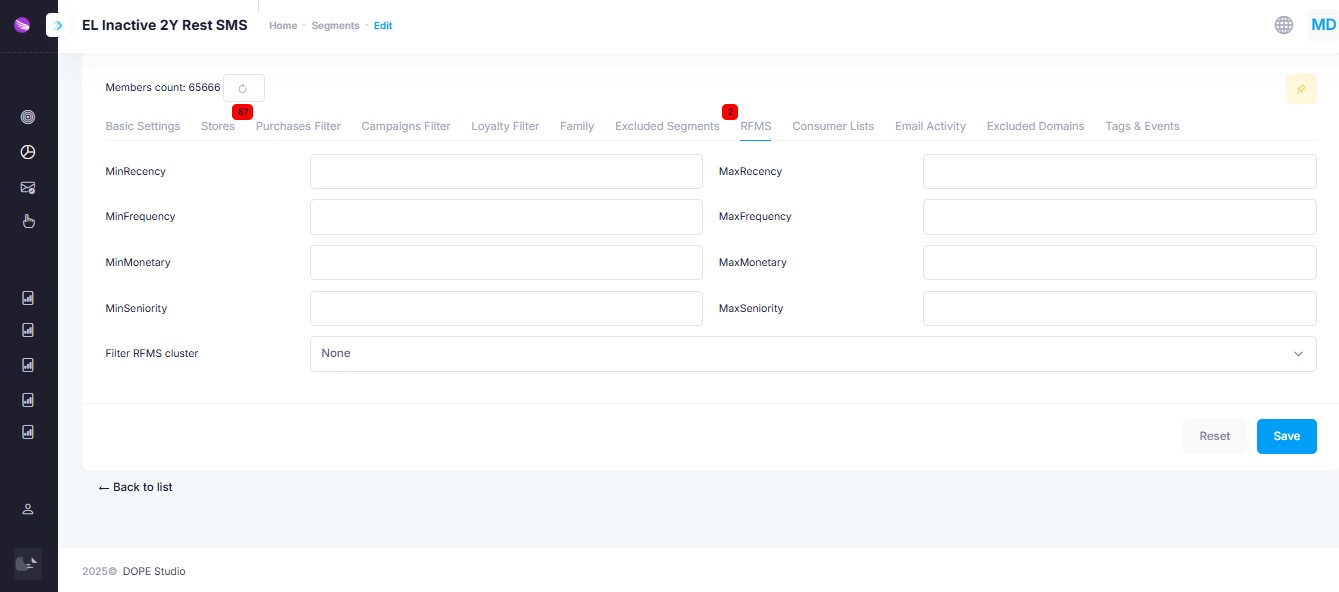
Target consumers using RFMS logic (Recency, Frequency, Monetary, Seniority):
- Min / Max Recency
- Min / Max Frequency
- Min / Max Monetary
- Min / Max Seniority
- RFMS Cluster: Predefined behavioral cluster
Consumer Lists
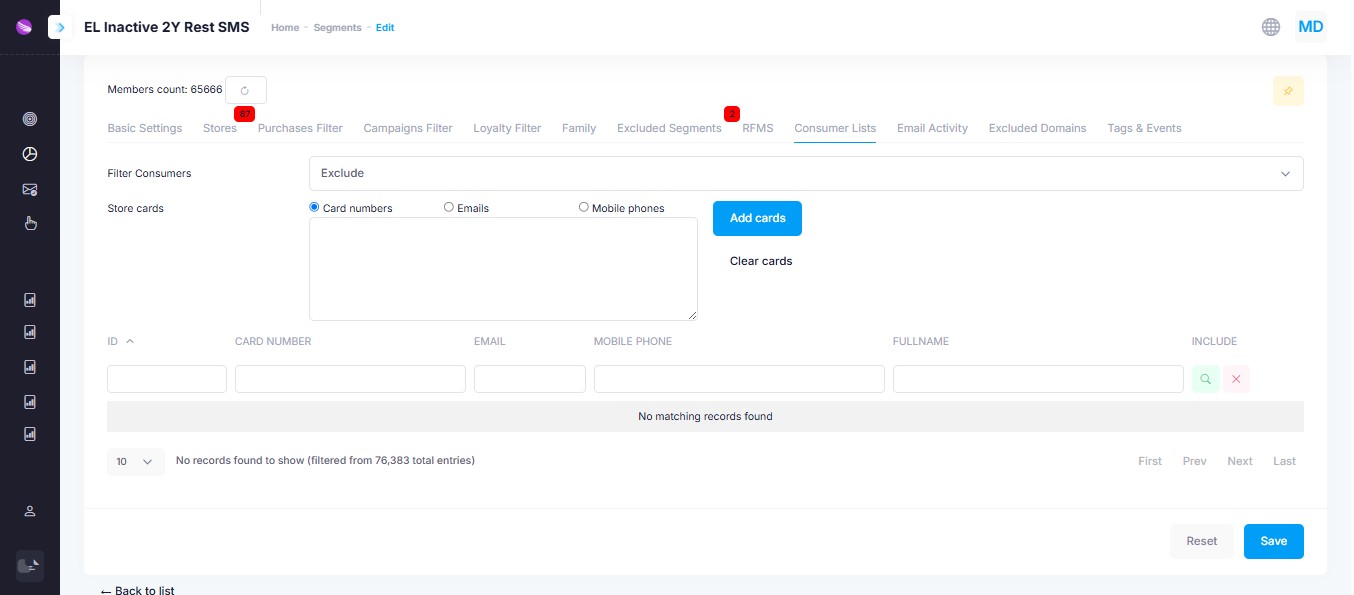
Manually exclude specific users based on:
- Card Numbers, Email Addresses, or Mobile Phones
- Paste values, then click Add Cards
- Use the search table below to verify or remove individual entries
Email Activity
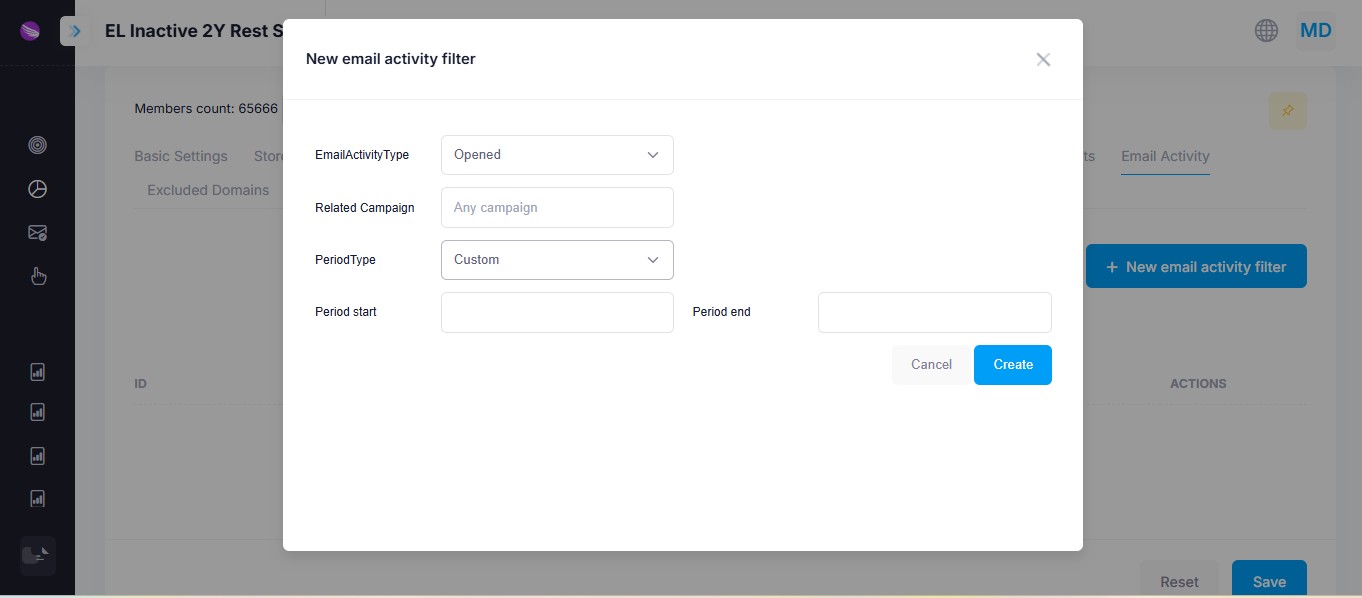
Filter users by their past engagement with your email campaigns:
- Activity Type: Opened, Clicked, Bounced, etc.
- Related Campaign: Limit to a specific campaign or apply globally
- Period Type: Select a custom date range or use presets like "Last 30 days"
Excluded Domains
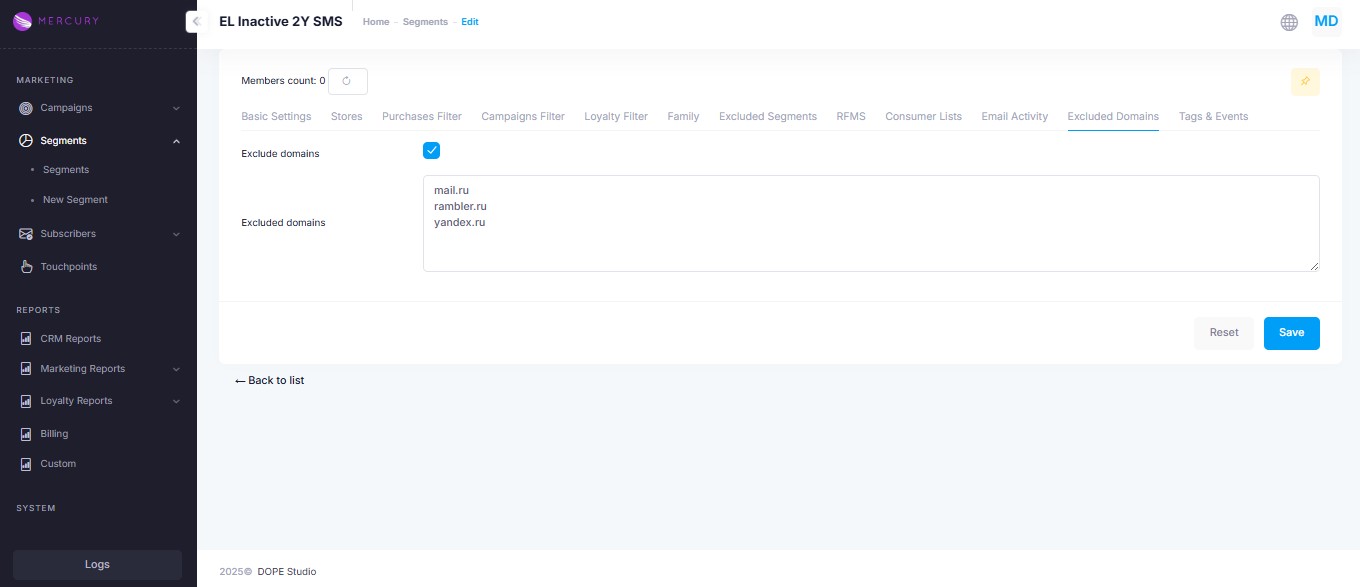
Exclude users with specific email domains (e.g. mail.ru, rambler.ru, yandex.ru):
- Enable Exclude Domains
- List the domains in the textbox
Tags & Events
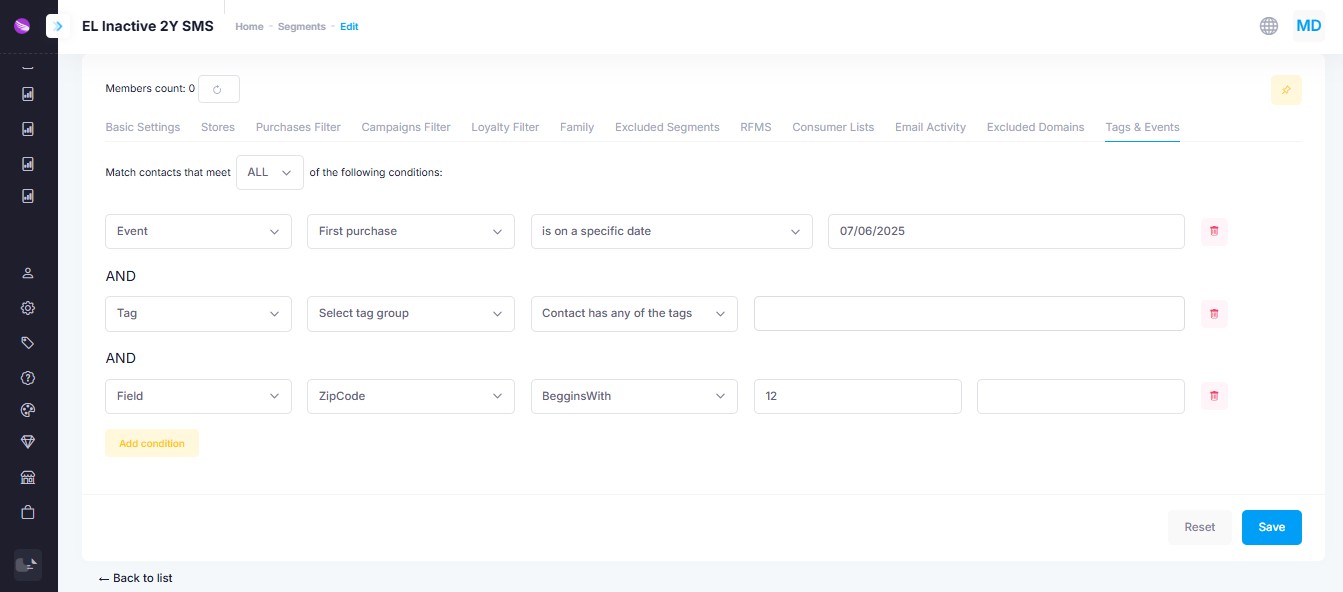
This tab allows advanced segmentation using behavioral tags, structured events, and custom field values. You can create complex filtering rules by combining multiple conditions with AND logic.
- Match contacts that meet ALL/ANY: Define whether all or at least one of the rules must match.
- Condition Types:
- Event: Filter by specific events like “First Purchase,” combined with a time condition (e.g., on a specific date, before/after date).
- Tag: Filter by tags from a tag group (e.g., “Contact has any of the tags”).
- Field: Apply conditions on custom fields, such as
ZipCode begins with 12.
You may add multiple conditions and remove them as needed.
Click Add condition to append a new rule.
This section offers high flexibility and is ideal for campaign personalization and localized targeting.